- An installed XVideo Xtra video overlay card. See your Hardware Installation Guide for instructions.
- A supported framebuffer card, display resolution, operating system, and windowing system (see your Release Notes for details). NOTE: Please see your Release Notes for the most recent list of tested/supported systems, framebuffers, and display resolutions. (You may also look at the system requirements in your Hardware Installation Guide, Appendix A.)
- You will need system RAM (64 MB recommended, 32 MB minimum) and swap space (64 MB recommended, 32 MB minimum).
Removing a Previous Version of Parallax Software
If you have a previous version of Parallax software for XVideo Xtra on your workstation, you must remove it before installing the new version.- Exit the windowing environment and get into command line mode. (Because this software includes server and driver software, you need to be outside the windowing environment-in command line mode-for this de-install to work correctly.)
- When you are in command line mode, login as root.
- Remove the previous version of Parallax software for XVideo Xtra:
# pkgrm PLXXvde
NOTE: If you have removed a Parallax Graphics video framebuffer card (XVideo, PowerVideo, MultiVideo) from this system, you may decide to free up some disk drive space by removing the framebuffer card software. See your framebuffer card Software Installation Guide for de-installation instructions. - Reboot your system to complete the de-installation.
Installation
Before you install, read the Release Notes and review Before You Install to make sure you have the hardware, software, etc. you need.Installing the Software
- If you haven't removed any previous version of Parallax Graphics software for XVideo Xtra, do so now. See here.
- Login as root.
- Insert the CD into the CD-ROM drive. Volume manager will auto mount the CD onto /cdrom/cdrom0. NOTE: If you are using a remote CD-ROM drive, see here.
- Start the installation with volume manager by loading the software from the
CD-ROM onto your hard drive.
For SBus and PCI bus users:
# cd /cdrom/cdrom0/solaris2.6
NOTE: If your system does not find the software in /cdrom/cdrom0, then look in /cdrom/plx_vde_xtra_20.
# pkgadd -d . - Follow the prompts to finish the installation. The interactive instructions will lead you to indicate whether you are using SBus or PCIBus, load the drivers, complete the installation and restart your system to start up the Parallax Graphics software. NOTE: We use /opt/parallax as the Parallax base directory for XVideo Xtra users. Please do not move the software since that would cause problems with Calibration.
Setting User Environment
Modifying your .cshrc or .profile file. Before you can use video, you need to set up your environment so it will run Parallax Graphics server extension and driver modules. The best place to set this environment is in your .cshrc or .profile file. Shown here are recommended sample lines for users of the C Shell, Bourne Shell, and Korn Shell. /opt/parallax is the location of the Parallax Graphics software. C Shell users: Log in and move to your home directory. Add the following to the end of your .cshrc file:setenv PARALLAX_HOME /opt/parallax setenv OPENWINHOME /usr/openwin set path=($PARALLAX_HOME/bin $OPENWINHOME/bin $path) setenv LD_LIBRARY_PATH $PARALLAX_HOME/lib:$OPENWINHOME/lib:/usr/libNOTE: The $PARALLAX_HOME/bin directory must appear in the search path before the $OPENWINHOME/bin directory. When you are finished, source the newly compiled changes to reset your environment:
# source .cshrcBourne Shell and Korn Shell users: Log in and move to your home directory. Add the following to the end of your .profile file:
	PARALLAX_HOME=/opt/parallax
	OPENWINHOME=/usr/openwin
	PATH=$PARALLAX_HOME/bin:$OPENWINHOME/bin:$PATH
	LD_LIBRARY_PATH=$PARALLAX_HOME/lib:$OPENWINHOME/lib:/usr/lib
	export PARALLAX_HOME OPENWINHOME PATH LD_LIBRARY_PATH
NOTE: The $PARALLAX_HOME/bin directory must appear in the search path before the $OPENWINHOME/bin directory. When you are finished, source the newly compiled changes to reset your environment:
# . .profile
Rebooting Your System
Since the Parallax Graphics software includes server extension and driver modules, you need to reboot your system before using video. Plus, after installing your Parallax Graphics video overlay card, you need to configure the video card into the kernel by using the command, reboot -- -r. Please reboot your system:# reboot -- -r
Setting Up xvconfig for Multiple Video Cards
For multiple video cards in one system you need to make sure that the Parallax software will know how many video cards are available on your system, so that it will access video inputs from more than one card. And the system needs to know how to map each video card to a display. You need to modify xvconfig to take care of these needs.- Open the "/etc/xvconfig" file. When you open xvconfig, it should be set up
to run one video card, and it should look like this:
:0.0 PGItv2 /dev/plxv0
# :0.0 PGItv2 /dev/plxv2
# :0.0 PGItv2 /dev/plxv4
- To use two video cards, you need to un-comment the second line. To use three video cards, you need to un-comment the second and third lines.
Calibrating the Digital Video Image
You need to calibrate your digital video display to place video in the right place in your video window. This is because the XVideo Xtra card is a video overlay card, which must be synchronized with your workstation's framebuffer. Calibration involves adjusting the horizontal and vertical alignment of the XVideo Xtra video overlay card (magenta grid) with the host framebuffer card (green grid). You have achieved proper alignment when the magenta and green grids overlay each other, producing a single white grid. Calibration must be done for both standard (Zoom 1x) video display and Zoom 2x video display.- For multiple video cards in one system: Edit the "/etc/xvconfig" file so all lines are commented out except the line ending in ".../plxv2" for a two-video-card system or ".../plxv4" for a three-card system (the last board must be calibrated first). Re-start the window server.
- Before you start Calibrate, you must be in the window server. If needed, use the command openwin to start the window server. NOTE: XVideo Xtra cards do not require a special start-up script (unlike our framebuffer cards-XVideo, PowerVideo, etc.-which use start_ow3).
- Start the Calibrate program with the following command:
# Calibrate
NOTE: If you did not set your path correctly in Setting User Environment, then you will need to change directories to /opt/parallax/bin before you run Calibrate. The Calibrate window appears.
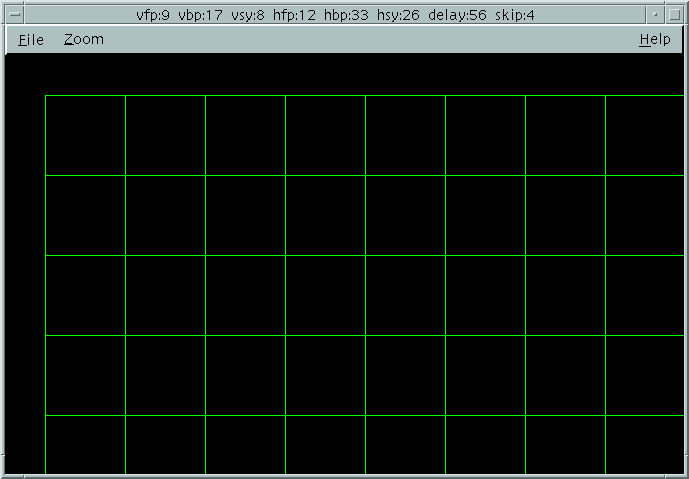
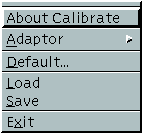 Figure 1-1 Displaying the File menu in the Calibrate screen
- Move the Calibrate window so that the left edge of the Calibrate window is at the left edge of your monitor screen. NOTE: The Calibrate window and grid may be wider than your display and run off the right edge so you can't see the Help pull-down menu (upper-right corner). You can ignore this or resize the window to fit in your display. NOTE: For a description of the Calibrate program options, pull down the "Help" menu in the upper right corner of the Calibrate window. (The "Help" menu may be hidden off the right edge of your display-see NOTE above.
- Pull down the "File" menu, then click on "Default."
- View the Default_Settings window.
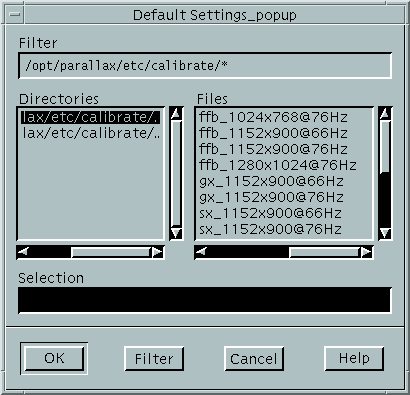 Figure 1-2 Use Default Settings to select your framebuffer type and display resolution.
a. Under "Directories" select "/opt/parallax/etc/calibrate/sbus" if you have an SBus system, or "/opt/parallax/etc/calibrate/pci" for a PCIBus system.
b. Under "Files" select a default settings file with your framebuffer type (for Creator or Creator 3D select "ffb..."), display resolution, and display frequency.
c. Click OK to apply the default settings for your choice.
NOTE: If you do not know the display resolution you are using, in a terminal window type the command xwininfo. At the prompt, click on the root (background) window. The window/display width and height (and a lot of other data) will appear in the terminal window. Example: ... Width: 1152 Height: 900
If you select a default settings file with the wrong framebuffer type, display resolution, or frequency the grid may not synchronize. The grid may jitter or roll vertically, or tear horizontally. If your grid jitters, rolls, or tears, re-select a framebuffer type, display resolution, and frequency and click OK.
NOTE:If you can't stabilize the grid after trying all the default settings files, go to Troubleshooting now.
d. When you have selected and applied (OK'd) a default settings file that has stabilized the grid, you are ready to close the Default_Settings menu. Click Cancel to close the menu.
- If you see any magenta or green grid lines in your Calibrate window, you
need to move the magenta (video overlay) grid onto the green (framebuffer)
grid until all the grid lines are on top of each other and look white. If
your grid is already 100% white, go to step 8.
a. Align Horizontal Lines: If the horizontal lines are magenta and green (instead of white), line up the magenta and green horizontal lines by using theand keys to move the magenta grid onto the green grid, until the horizontal lines are white.
b. Align Left Vertical Lines: If the vertical grid line closest to the left edge of your display is magenta or green (instead of white), then move the far left magenta line onto the far left green line by using theand keys for large adjustments, and then for fine adjustments, until the far left vertical line is white.
c. Resize Width of Magenta Grid: If you can still see magenta and green lines, then resize the width of the magenta grid with the S andS keys until the magenta grid fits onto the green grid, producing one white grid. When you are finished with this step, all of the grid lines should be lined up and white, with no magenta or green showing.
NOTE:If you are not able to line up all your magenta and green lines with the commands above, go to Troubleshooting now.
Table: Summary of Calibration alignment command keysKey Function <Up Arrow> <Down Arrow> Align horizontal magenta lines with horizontal green lines until the lines overlap and become white. <Left Arrow> <Right Arrow> Move far left magenta line onto far left green line until they become a single white line. <Shift><Left Arrow> <Shift><Right Arrow> Same as above, but smaller movements. S <Shift>S Resize the width of the magenta grid until it fits onto the green grid, producing a single white grid.
- So you won't need to re-calibrate every time you log in, pull down the File menu and select "Save" to save the Calibration settings. The Calibration settings are written to /opt/parallax/etc/plxv0.
- Pull down the Zoom menu (in the upper left corner of the Calibrate window) and choose Zoom_2 to calibrate for Zoom 2x mode.
- Use the arrow keys to align the two grids (repeat step 7. for Zoom_2).
- Pull down the File menu and select "Save" to save the Calibration settings for Zoom_2.
- Pull down the Zoom menu and choose "Normal" to return to Zoom 1x mode. Otherwise, the first time you start a video overlay application (VideoTool et al), it will launch in Zoom 2x mode.
- Pull down the File menu again and select Exit to exit Calibrate.
- For multiple cards in one system: Change directories to "/opt/parallax/etc" and rename ("mv") the file "plxv0" to either "plxv2" if you just calibrated the second card, or "plxv4" if you calibrated the third card. If you just calibrated the first card, do not rename the file.
- For multiple cards in one system: If you have not calibrated all of the video cards yet, edit the "/etc/xvconfig" file, comment out the line for the video card you just calibrated, and uncomment the line before it. Re-start the server. Repeat steps 3 through 14.
If you have already calibrated all the video cards, edit the "/etc/xvconfig" file and uncomment the lines for each video card (".../plxv0" and ".../plxv2" for two cards, plus ".../plxv4" for three cards).
- Restart the server.
- Congratulations! You are now ready to use video. See your Multimedia User's Guide for details.
- So you won't need to re-calibrate every time you log in, pull down the File menu and select "Save" to save the Calibration settings. The Calibration settings are written to /opt/parallax/etc/plxv0.
If You Have Problems
If you are not able to calibrate your video card with the instructions above, go to Troubleshooting now.
Installation from a Remote CD-ROM
If your system does not have a local CD-ROM drive, you can install the software from a remote system with a CD-ROM drive:
- From the remote system, export the CD-ROM using Solaris 2.x share. For
further information, see the man pages for share.
- From your system, mount the CD-ROM file system on your machine and install
the software (see pages 9 through 20).
- After installation is complete, unmount the CD.
Troubleshooting
Here are a few tips to help you solve common problems. If you need further technical assistance, please contact Parallax Graphics technical support
Calibrate is not Working
We use /opt/parallax as the Parallax base directory for XVideo Xtra users. Please do not move the software to another directory since that would cause problems with Calibration.
If you have tried selecting the available default files for Calibrate and are unable to manipulate any of them into properly aligning the grids, then using "Calibrate -hv" may help.
NOTE: You should only use the "-hv" option if you can't get the normal Calibrate procedure to work, and you should use the "-hv" commands (H, <Shift>H, V, and <Shift>V) to the minimum extent required for Calibration.
- Follow Calibration steps 1 and 2 as usual
- Modified Step: Start the Calibrate -hv program with the command:
# Calibrate -hv
- Follow Calibration steps 4 to 6 as usual
- New Step-Stop Vertical Rolling or Jittering: If the magenta grid is rolling
or jittering vertically, strike the <Shift>V key combination one to four
times in an attempt to "lock" the video signal (stop the magenta grid from
moving, rolling, or jittering). Do not use <Shift>V more than 3-4 times.
Count the number of times you use <Shift>V.
If <Shift>V has no effect, strike the V key the same number of times to return to the starting settings. Then strike the V key one to four times. Count the number of times you use V. Stop when the magenta grid is locked in place vertically, and is not moving.
Note: Use V and <Shift>V as little as possible.
- Follow Calibration step 7-a as usual
- Follow Calibration step 7-b as usual
- Follow Calibration step 7-c as usual. If you can produce a single white grid
without any magenta or green lines, continue the standard calibration procedure
until you are finished calibrating. Otherwise, follow step 9 below.
- New Step--Resize Width of Magenta Grid(step 7-c): If you are not able to produce a single
white grid with the S and <Shift>S commands, strike the H key one to four
times in an attempt to resize the magenta grid until it is nearly the same width
as the green grid.
Do not use the H key more than 3-4 times. If the H key does not work, then use the <Shift>H key combination to reisze the magenta grid until the grids are nearly the same width.
Then follow step 7-c to make smaller adjustments to resize the magenta grid with the S and <Shift>S keys as needed.
- Complete the Calibration as usual with steps 8 to 17.
| Key | Function |
| V <Shift>V | Caution: Use jsut enough to stop the magenta grid from moving vertically, up to 4 times. |
| <Up Arrow> <Down Arrow> | Align horizontal magenta lines with horizontal green lines until the lines overlap and become white. |
| <Left Arrow> <Right Arrow> | Move far left magenta line onto far left green line until they become a single white line. |
| <Shift><Left Arrow> <Shift><Right Arrow> | Same as above, but smaller movements. |
| S <Shift>S | Resize the width of the magenta grid until it fits onto the green grid, producing a single white grid. |
| H <Shift>H | Caution: Use just enough to resize the video of the magenta grid to nearly match the green grid, up to 4 times (then use S and <Shift>S) |
VideoTool and MovieTool Won't Start
If you can't start the Parallax application, VideoTool or MovieTool, verify that the following environment variables are set correctly:
- PARALLAX_HOME should refer to the location where the Parallax Graphics software is installed (/opt/parallax).
- LD_LIBRARY_PATH should contain at least the following: /usr/openwin/lib, /usr/lib, and $PARALLAX_HOME/lib.
- PATH should contain at least the following: $PARALLAX_HOME/bin, /usr/openwin/bin, and /usr/bin.
Note: $PARALLAX_HOME/bin must always precede /usr/openwin/bin.
What's Next?
You have finished the installation of the Parallax Graphics software. We invite you to explore the capabilities of your XVideo Xtra video overlay card through our sample applications, VideoTool and MovieTool:
- VideoTool supports live video display and still image capture.
- MovieTool supports motion video capture and playback. MovieTool uses XVideo Xtra's hardware compression.
VideoTool and MovieTool are fully described in your Multimedia User's Guide.
If after learning to use VideoTool and MovieTool you decide you need a custom video application, you can use the Parallax Video Development Environment to build your own application. For more information, see your Video Development Environment Reference Guide.
If you have a need for application software such as desktop video conferencing or multimedia authoring, please consult the Parallax web site (www.parallax.com) or contact Parallax for a list of independent software vendors.
Thank you for choosing Parallax Graphics video.