Hardware InstallationGuide
For XVideo, PowerVideo, and MultiVideo on Sun SPARCstations
Part Number: 917-026015, Rev. D
(C) Copyright Parallax Graphics, Inc. 1996. All rights reserved.
Printed in the U.S.A.
Parallax Graphics, Inc., 2500 Walsh Street, Santa Clara, CA 95051 USA
Phone: 408-727-2220; Fax: 408-727-2367
E-mail: info@parallax.com
World Wide Web: http://www.parallax.com
No part of this manual or the accompanying software may be reproduced or transmitted in any form or by any means--electronic or mechanical, including photocopying and recording--without the prior written permission of Parallax Graphics, Inc.
VideoStream, XVideo, PowerVideo, MultiVideo, Video Development Environment, VideoTool, MovieTool, Real-Time MovieTool, and Parallax Graphics are trademarks or registered trademarks of Parallax Graphics, Inc.
All other products or services mentioned in this document are identified by the trademarks or service marks of their respective companies or organizations, and Parallax Graphics, Inc. disclaims any responsibility for specifying which marks are owned by which companies or organizations.
Preface
This preface describes how to use this manual and how to reach us if you need technical support. This preface includes:
-
- How To Use This Manual
- For Installation and Reference
- Font Conventions
- Related Documents
- Technical Support Contacts
Before you begin using this manual, please read your Release Notes to find out about any recently added instructions.
This Hardware Installation Guide describes your Parallax Graphics video card and cables, and tells you how to install the video card and set up the cables. You can use this manual as an installation guide and a reference.
- Italics Manual titles, new terms being defined.
- Typewriter Font Commands typed in an X window, text that would appear in an X window.
- Release Notes Skim before installation, then read in detail. These notes provide important information about recent changes and bugs.
- Software Installation Use for software installation and
- Guide de-installation.
- Multimedia User's Learn how to use the application software,
- Guide VideoTool, MovieTool, etc.
- Video Development For developers who purchase the Video
- Environment Development Environment: Use for
- Reference Guide developing your own video applications.
Technical Support Contacts
If you need any technical assistance during installation, please contact Parallax Graphics technical support:
- Parallax Graphics Technical Support
- Herndon, VA USA
- Phone: +1 703-450-7718
- Fax: +1 703-450-7719
- E-mail: tsupport@parallax.com
- World Wide Web: http://www.parallax.com/support
-
- Parallax Graphics World Headquarters
- 2500 Walsh Street
- Santa Clara, CA 95051 USA
- Phone: 408-727-2220
- Fax: 408-727-2367
-
-
-
-
Table of Contents
- Preface
- How To Use This Manual
- Technical Support Contacts
-
- Introduction
- General Description
- XVideo
- PowerVideo and MultiVideo
- System Requirements
-
- Installing the Video Card
- Powering Down Your System
- Removing the System Cover
- Static-Proofing Your Installation Site
- Installing 2-Slot Cards: XVideo
- Installing 1-Slot Cards: PowerVideo or MultiVideo
- Replacing the Top Cover
-
- Connecting Cables and Devices
- Video Cables for XVideo
- Video Cables for PowerVideo or MultiVideo
- Optional: Cables for Older Monitors
- Optional: Audio Cables
- How to Connect the Cables
- Powering Up the SPARCstation
-
- Appendix A: Parallax Video Specifications
- General Specifications
- Specific Video Cards
-
- Appendix B: Hardware Warranty and Repairs
- Hardware Warranty
- If You Need a Repair
-
- Appendix C: RS232-Controlled Video Devices
- Supported Serial Video Devices
- Connecting a Serial Video Device
-
- Index
-
Introduction
This chapter briefly describes your Parallax Graphics video card and system requirements. This chapter includes:
-
- General Description
- XVideo
- PowerVideo and MultiVideo
- System Requirements
XVideo, PowerVideo, and MultiVideo are all 32-bit SBus framebuffer cards that display high quality video on your workstation:
- Full motion video
- 30 frames/second NTSC
- 25 frames/second PAL or SECAM
- Full resolution video
- 640x480 pixels (525 line) NTSC
- 768x576 pixels (625 line) PAL or SECAM
- 24-bit TrueColor video and graphics
On the following pages are brief descriptions of XVideo, PowerVideo, and MultiVideo cards.
The XVideo card comes in several versions--each available with or without compression/decompression hardware.
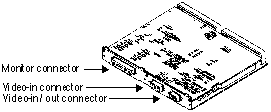
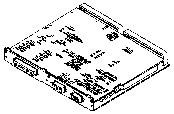
- Figure 1-1 XVideo-VIO/RGB: XVideo with a VIO or RGB daughter card.
XVideo-VIO and XVideo-RGB cards support two video inputs and video output for recording to or displaying on an external device such as a VCR or video projector. At a given moment, you can display live video inputs from two sources simultaneously, or you can display one live video input and send video out to a VCR or other device.
If you have hardware compression/decompression (part #XVC-VIO or XVC-RGB), you can also capture and play back digital video in real time for applications such as capturing movies and videoconfer-encing. (Part #XV-VIO and XV-RGB do not include compression.)
XVideo-VIO accepts video input from and sends output to composite and S-VHS (Y/C) video devices. XVideo-RGB accepts video input from and sends output to composite and RGB/YUV video devices.
- Figure 1-2 XVideo without the VIO or RGB daughter card.
XVideo without the VIO or RGB options (part # XVC or XV) supports one composite video input. If you have hardware compression/decompression (part #XVC), you can also capture and play back digital video in real time to capture movies and videoconference.
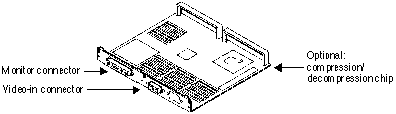
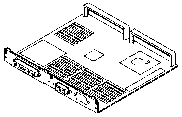
PowerVideo and MultiVideo cards both are single-slot SBus cards that support one video input from a composite video source.
- Figure 1-3 PowerVideo or MultiVideo card.
PowerVideo
The PowerVideo card (part #PVC) supports one composite video input, and includes hardware compression/decompression. The hardware compression allows you to capture and playback digital video in real time for applications like capturing movies and networked applications like videoconferencing.
MultiVideo
The MultiVideo card (part #MV) supports a single composite video input for viewing video in a window and capturing video still images for applications like video monitoring.
- Platform SPARC-based workstations
- SBus Interface One or two available SBus slots:
- XVideo: 2 SBus slots
- PowerVideo or MultiVideo: 1 SBus slot
- Operating System Solaris 2.x (2.5, 2.4, or 2.3) or Solaris 1.x (SunOS 4.1.x)
- Window Environment OpenWindows (for Solaris 2.x or 1.x) or X11R5 (for Solaris 1.x only)
- Available Disk Space* 15-35 Megabytes (MB) space on a local hard drive:
- Solaris 2.5/OpenWindows 3.5: 35 MB
- Solaris 2.4/OpenWindows 3.4: 35 MB
- Solaris 2.3/OpenWindows 3.3: 35 MB
- Solaris 1.x (SunOS 4.1.x)/OpenWindows 3.0: 20 MB
- Solaris 1.x (SunOS 4.1.x)/X11R5 1.2: 20 MB
- Solaris 1.x (SunOS 4.1.x)/X11R5 1.1: 15 MB
- System RAM 32 MB recommended (16 MB minimum)
- Swap Space* 60 MB recommended (32 MB minimum)
- Monitor Types XVideo standard: 1152x900 pixels x 66 Hz
- XVideo 76 Hz (special order): 1152x900 pixels x 76 Hz
- PowerVideo or MultiVideo:
- 1152x900 pixels x 76 Hz
- 1152x900 pixels x 66 Hz
- 1152x900 pixels x 60Hz
- 1024x768 pixels x 72 Hz
- 640x480 pixels x 60 Hz
-
-
- Because XVideo is a two-slot SBus card, it does not fit in an UltraSPARC. If you want to install a Parallax Graphics video card in an UltraSPARC, you need to use a PowerVideo or MultiVideo card.
This chapter describes how to install your Parallax Graphics video card in your SPARCstation. This chapter includes:
-
- Powering Down Your System
- Removing the System Cover
- Static-Proofing Your Installation Site
- Installing 2-Slot Cards: XVideo
- Installing 1-Slot Cards: PowerVideo or MultiVideo
- Replacing the Top Cover
- We hope that your installation of your XVideo, PowerVideo, or MultiVideo card is easy and problem-free. If you need any technical assistance during installation, please contact Parallax Graphics technical support (email tsupport@parallax.com), or see here for complete contact information).
- We recommend that you read the Release Notes before you begin installation, to get up-to-date information about bugs and recent product enhancements and changes.
Before you begin installation, save all of your work and power down the system by following these steps:
- Please refer to your SPARCstation Installation Guide for more details about how to power down networked SPARCstations.
- Log in as superuser (root), sync your file systems, and halt the operating system:
- Wait for the following string of messages to appear, then continue:
- Turn off the power to your system in the following sequence:
- Turn off any external drives.
- Turn off your SPARCstation.
- Turn off your monitor.
- Connect and disconnect the workstation cables as follows:
- Disconnect your monitor power cable.
- Leave the SPARCstation power cable connected to a grounded power outlet.
- Disconnect cables to any SBus cards in the SPARCstation.
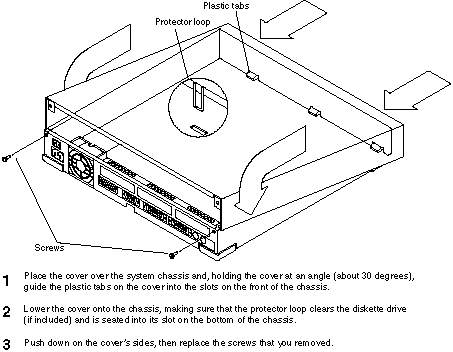
To access the SBus slots for hardware installation, remove the top cover of the SPARCstation:
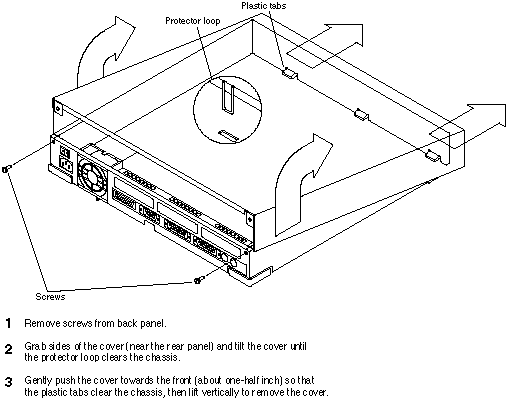
- Figure 2-1 Removing the SPARCstation system cover.
- We recommend you do your installation while standing on an anti-static floor mat (for details, see following page).
- Remove the screws from the back panel.
- Grab the sides of the cover (near the rear panel) and tilt the cover until the protector loop clears the chassis.
- Gently push the cover towards the front (about one-half inch) so that the plastic tabs clear the chassis, then lift vertically to remove the cover.
You must follow these steps to protect yourself, your SPARCstation, and your video card from static, electric shocks, and damage during installation. If you do not, circuits may be damaged.
- We recommend standing on an anti-static floor mat during installation.
- Use a grounding strap (we supply a grounding strap in your hardware package):
- Attach one end of the grounding strap to your wrist. (With the adhesive side to your skin, wrap the grounding strap firmly around your wrist--about two or three times.)
- Connect the other end (the copper end) of the grounding strap to the metal casing of the SPARCstation power supply.
- The SPARCstation power supply should be clearly labeled. If you have difficulty locating the power supply, please refer to your SPARCstation installation guide.

- Figure 2-2 Attaching the grounding strap to your wrist and SPARCstation.
The following installation steps apply to Parallax Graphics dual-slot video cards: XVideo-VIO/RGB and XVideo.
- Because UltraSPARCs do not have adjacent (side-by-side) SBus slots, XVideo will not fit in an UltraSPARC.
- Figure 2-3 XVideo-VIO/RGB cards (with VIO or RGB daughter cards) come with or without hardware compression/decompression.
- Figure 2-4 XVideo cards (without VIO or RGB) come with or without hardware compression/decompression.
- Getting Ready
- Gather the tools you will need:
- A #1 Phillips screwdriver
- A small-blade flat-head screwdriver
- Make sure you have protected yourself and your equipment from static electricity (see page 2-4).
- Verifying Monitor Display Size, Refresh Rate
- Verify that the monitor that you plan to connect to your XVideo card matches the display size and refresh rate supported by your XVideo card.
- XVideo supports the Sun-standard monitor display size and refresh rate of 1152 x 900 pixels x 66 Hz, or can be special-ordered to support 1152 x 900 pixels x 76 Hz monitors. Please make sure you use the right kind of monitor for your XVideo card.
- The Framebuffer
- The XVideo card contains an integrated framebuffer that will control a workstation display monitor. If you plan to set up your system with one monitor, you need to remove the standard framebuffer from your workstation and replace it with XVideo.
- If you plan to set up your system "multi-headed" with more than one display monitor, you can use a separate framebuffer to control each monitor. In this case, you could use multiple Parallax video cards per workstation (with Solaris 2.5) or multiple framebuffers and one Parallax video card per workstation (with Solaris 2.x or Solaris 1.x/SunOS 4.1.x). If you plan to set up a multi-headed system, please read Using Multiple Displays in your Software Installation Guide for additional instructions.
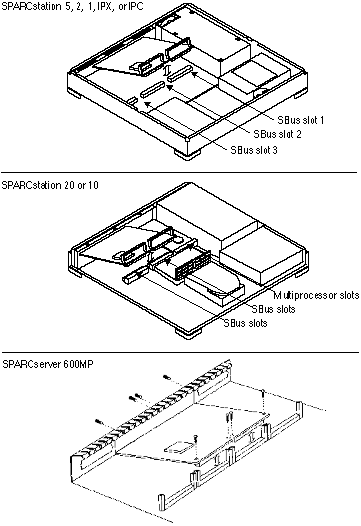
- Available SBus Slots
- In addition, your XVideo card requires two adjacent SBus slots. If any SBus cards are already in the slots that you plan to put your XVideo card into, you will need to move the other cards.
- Please refer to your SPARCstation user guide for complete instructions on moving or removing SBus cards.
- For SPARCstation 20 or 10:
- Push back the latches on either side of each of the SBus sockets; grasp the sides of the SBus card on the end near the SBus socket; pull up to release the card from the socket; and pull the SBus card away from the back panel at an angle. The XVideo card fits best in the upper two SBus slots, since the lower slots of the SPARCstation chassis do not provide optimal space for a dual-slot SBus card.
- For SPARCserver 600MP:
- Loosen the mounting screws that secure the card to the mothercard; grasp the sides of the SBus card on the end near the SBus socket; pull up to release the card from the socket; and pull the SBus card away from the back panel at an angle.
- For SPARCstation 5, 2, 1, IPX, or IPC:
- Grasp the sides of the SBus card on the end near the SBus socket; pull up to release the card from the socket; and pull the SBus card away from the back panel at an angle.
- Store the cards you remove in separate static-proof envelopes.
- Removing Metal Protector Plates
- Remove metal protector plates from any sealed SBus slots that you plan to use.
- For SPARCstation 20, 10, or SPARCserver 600MP:
- Remove the two screws that hold the plates in place with the #1 Phillips screwdriver. Save the screws to secure the XVideo card backplate to the back panel. (You may also want to save the protector plates for future use.)
- For SPARCstation 5, 2, 1, IPX, or IPC:
- Pinch the two tension clips at the bottom of each plate and pull the plate up and out.
- Removing a Backplate Adapter
- For SPARCstation 20, 10, or SPARCserver 600MP (only):
- The XVideo backplate adapter is required for SPARCstation 5, 2, 1, IPX, or IPC installation, but it must be removed to refit the XVideo bezel for installation into the SPARCstation 20, 10, or SPARCserver 600MP back panel.
- The backplate adapter is held in place by screws. To remove this adapter, simply remove the screws with a #1 Phillips screwdriver. The adapter and screws are not needed for the remainder of this installation, but may be stored for future use.
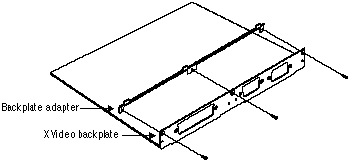
- Figure 2-5 Removing the XVideo backplate adapter.
- For SPARCserver 600MP (only):
- The XVideo retainers are required for a SPARCstation 20, 10, 5, 2, 1, IPX, or IPC installation to keep the XVideo card from wiggling out of its SBus slots.
- But the XVideo retainers must be removed for installation in a SPARCserver 600 MP. In later steps for the SPARCserver 600MP, you'll secure the XVideo card to the SPARCserver card with screws placed in the mounting screw holes that are exposed once the retainers are removed.
- Remove both XVideo retainers (spread the retainer legs apart and lift as shown in the following figure). When the retainers are removed, this will expose the mounting screw holes.
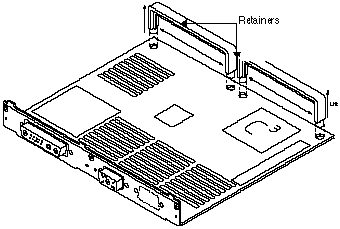
- Figure 2-6 Removing XVideo retainers for SPARCserver 600MP installations.
- On the SPARCserver 600MP mothercard, remove the mounting screws from the SBus standoffs on either side of the SBus sockets where you plan to install your XVideo card.
- Save the screws that you remove from the SPARCserver 600MP mothercard. You'll need these to secure the XVideo card to the SPARCserver mothercard.
- Installing the XVideo Card
- Slide the XVideo card into the back panel of the system.
- Do this at a 30 degree angle, holding the sides of the XVideo card, and making sure that the XVideo card hooks into the holes on the back panel of your system.
- Figure 2-7 Installing an XVideo card.
- Align the XVideo connector pins with the SBus socket and press the card firmly into place.
- Securing the XVideo Card in Place
- For SPARCstation 20 or 10:
- Press the latches on either side of each SBus socket into the XVideo card. Then, secure the XVideo backplate to the back panel, using the mounting screws that you removed when you took out the metal plate protectors (step 4).
- For SPARCserver 600MP:
- Secure the XVideo card to the standoffs on the SPARCserver 600MP mothercard with the screws that you removed from the mothercard standoffs (step 6). Then, secure the XVideo backplate to the back panel with the screws that you pre-viously removed from the XVideo backplate adapter (step 5).
- Installing Metal Protector Plates
- Install metal protector plates in any SBus slots left open.
The following installation steps apply to Parallax Graphics single-slot video cards: PowerVideo and MultiVideo.
- Figure 2-8 Parallax Graphics single-slot PowerVideo or MultiVideo card.
- Getting Ready
- Gather the tools you will need:
- A #1 Phillips screwdriver
- A small-blade flat-head screwdriver
- Make sure you have protected yourself and your equipment from static electricity (see here).
- Setting Up Monitor Display Size, Refresh Rate
- Verify that the monitor that you plan to connect to your PowerVideo or MultiVideo card has one of the supported display sizes and refresh rates:
- 1152 x 900 pixels x 76 Hz
- 1152 x 900 pixels x 66 Hz
- 1152 x 900 pixels x 60 Hz
- 1024 x 768 pixels x 72 Hz
- 640 x 480 pixels x 60 Hz
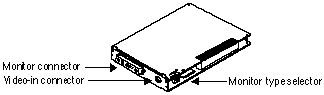
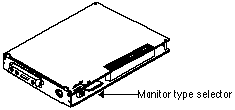
- If you have a monitor which is not the default display size and rate of 1152 x 900 pixels x 66Hz, you will need to manually select your monitor's display size and refresh rate.
- To select a monitor type, insert a 2/16-inch blade screw driver into the rotary-switch slot on your PowerVideo or MultiVideo card and turn the arrow clockwise to the correct switch position:
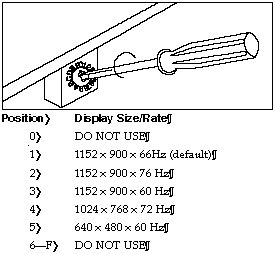
Figure 2-8b Rotary Switch Settings.
- The Framebuffer
- PowerVideo and MultiVideo cards contain an integrated framebuffer that will control a workstation display monitor. If you plan to set up your system with one monitor, you need to remove the standard framebuffer from your workstation and replace it with PowerVideo or MultiVideo.
- If you plan to set up your system ``multi-headed'' with more than one display monitor, you can use a separate framebuffer to control each monitor. In this case, you could use multiple Parallax video cards per workstation (with Solaris 2.5) or multiple framebuffers and one Parallax video card per workstation (with Solaris 2.x or Solaris 1.x/SunOS 4.1.x). If you plan to set up a multi-headed system, please read Using Multiple Displays in your Software Installation Guide for additional instructions.
- Available SBus Slot
- In addition, your PowerVideo or MultiVideo card requires one open SBus slot. If an SBus card is already in the slot that you plan to put your video card into, you will need to move the other card.
- Please refer to your SPARCstation user guide for complete instructions on moving or removing SBus cards.
- For UltraSPARC, SPARCstation 20, or 10:
- Push back the latches on either side of each of the SBus sockets; grasp the sides of the SBus card on the end near the SBus socket; pull up to release the card from the socket; and pull the SBus card away from the back panel at an angle.
- For SPARCserver 600MP:
- Loosen the mounting screws that secure the card to the mothercard; grasp the sides of the SBus card on the end near the SBus socket; pull up to release the card from the socket; and pull the SBus card away from the back panel at an angle.
- For SPARCstation 5, 2, 1, IPX, or IPC:
- Grasp the sides of the SBus card on the end near the SBus socket; pull up to release the card from the socket; and pull the SBus card away from the back panel (at an angle).
- Store the cards you remove in separate static-proof envelopes.
- Removing Metal Protector Plates
- Remove metal protector plates from any sealed SBus slots that you plan to use.
- For UltraSPARC, SPARCstation 20, 10, or SPARCserver 600MP:
- Remove the two screws that hold the plate in place with the #1 Phillips screwdriver. Save the screws to secure the PowerVideo or MultiVideo card backplate to the back panel. (You may also want to save the protector plate for future use.)
- For SPARCstation 5, 2, 1, IPX, or IPC:
- Pinch the two tension clips at the bottom of the plate and pull the plate up and out.
- Removing a Backplate Adapter
- For UltraSPARC, SPARCstation 20, 10,
- or SPARCserver 600MP (only):
- The PowerVideo or MultiVideo backplate adapter is required for SPARCstation 5, 2, 1, IPX, or IPC installation, but it must be removed to refit the video card bezel for installation into the UltraSPARC, SPARCstation 20, 10, or SPARCserver 600MP back panel.
- The backplate adapter is held in place by screws. To remove this adapter, simply remove the screws with a #1 Phillips screwdriver. The adapter and screws are not needed for the remainder of this installation, but may be stored for future use.
-
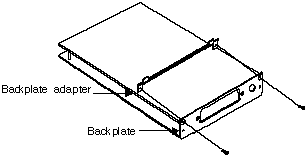
- Figure 2-9 Removing the PowerVideo/MultiVideo backplate adapter.
- Replacing Intra-Card Standoffs
- For SPARCserver 600MP (only):
- The PowerVideo or MultiVideo intra-card standoffs are required to hold a single-slot Parallax card together in an UltraSPARC, SPARCstation 20, 10, 5, 2, 1, IPX, or IPC.
- But the intra-card standoffs must be removed for installation in a SPARCserver 600 MP, and replaced with the standoff-and-screw assembly provided in the SPARCserver 600 MP adapter kit. In later steps, you will secure the Parallax card to the SPARCserver card with this standoff-and-screw assembly.
- To replace each of the two standoffs on a single-slot Parallax card:
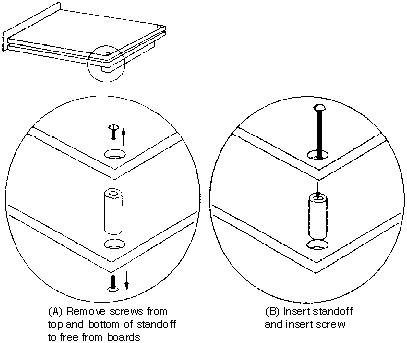
- Figure 2-10 Replacing Intra-Card Standoffs.

- Figure 2-11 Installing the boards.
- Figure 2-12 Replacing the Top Cover.
This chapter gives information on the cables included with your video card, audio cables and connections, how to set up cables for a variety of configurations with video and audio, and how to power up the SPARCstation after installation is complete. This chapter includes:
-
- Video Cables for XVideo
- Video Cables for PowerVideo or MultiVideo
- Optional: Cables for Older Monitors
- Optional: Audio Cables
- How to Connect the Cables
- Powering Up the SPARCstation
- Be sure that the power on your SPARCstation is turned off before you start connecting cables.
Your XVideo card comes with the standard composite video input cable and BNC-to-RCA adapter to connect video input devices.
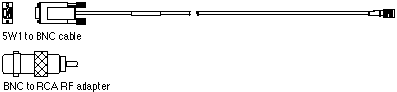
- Figure 3-1 The XVideo standard video input cable and BNC/RCA adapter (5W1/BNC, part #XV-C-S).
Additional Cable for XVideo-VIO/RGB
If you have purchased the XVideo-VIO or XVideo-RGB card, your shipping package will also contain one of the standard HD15 cables shown below for the connection of video input/output devices.

- Figure 3-2 The XVideo-VIO composite/S-VHS (YC) video input/output cable (HD15/3BNC-2DIN, part #XV-C-VIO).

- Figure 3-3 The XVideo-RGB component video input/output cable (HD15/8BNC, part #XV-C-RGB).
Your PowerVideo or MultiVideo card comes with the standard RCA-to-RCA composite input cable and RCA-to-BNC adapter shown below for the connection of video input devices.
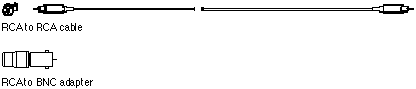
- Figure 3-4 The standard PowerVideo/MultiVideo composite video input cable and RCA/BNC adapter (RCA/RCA, part #PVC-C-S).
Some older SPARCstation monitors (``high-resolution'' monitors) require special cables for use with Parallax Graphics video cards. If you need these cables, you need to special-order them from Sun Microsystems or from Parallax Graphics. If you have already ordered these cables from Parallax, they are packed with your other cables.
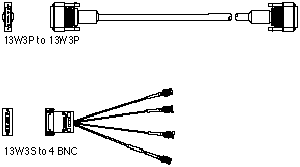
- Figure 3-5 Special cables required for some older SPARCstation monitors. (TOP: 13W3P/13W3P, part #XV-C-MON; BOTTOM: 13W3S/4BNC, part #XV-C-MA).
Setting Up the Cables
- Connect the 13W3S/4BNC adapter cable to the monitor.
- Connect one end of the 13W3P/13W3P cable to the monitor adapter cable; connect the other end to your video card.
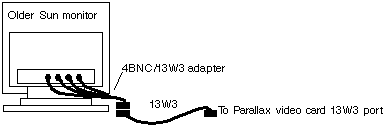
- Figure 3-6 Connecting a Parallax Graphics video card to an older SPARCstation "high-resolution" monitor.
To connect audio devices to your SPARCstation, you need a standard SPARCaudio cable from Sun Microsystems and you may need any of the audio adapters shown in the following figure, which are available at most electronics parts stores.
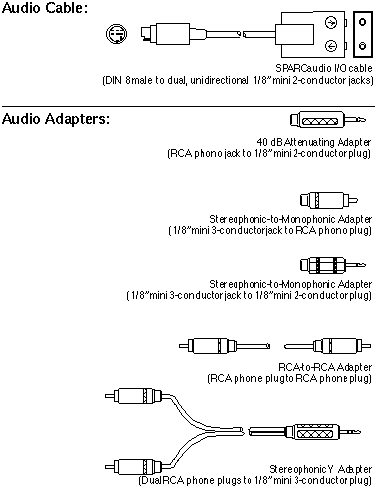
- Figure 3-7 Sun SPARCaudio cable and standard audio adapters.
This section provides diagrams of a variety of system configurations with video and audio. Some of the diagrams show RS232-controlled video devices. If you are planning to use an RS232 video device, please read Appendix C: RS232-Controlled Video Devices for more information.
- Before you start connecting cables, make sure the SPARCstation power is turned off.
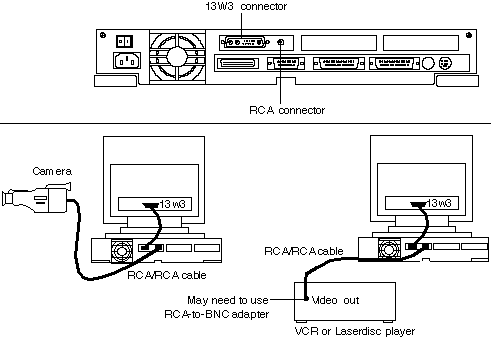
XVideo: Video Input
- Figure 3-8 Connecting video input devices (video camera, VCR, laserdisc player, TV cable, etc.) to XVideo.
XVideo: Video Input (Camera) and Audio

- Figure 3-9 Connecting a camera, microphone, and speaker to XVideo.
XVideo: Video Input (TV, VCR) and Audio
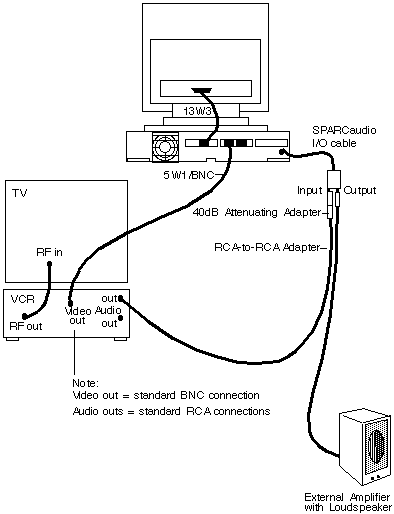
- Figure 3-10 Connecting a TV monitor (and optional TV cable), VCR, and speaker to XVideo.
- If you want to connect a TV cable to a video card, you need to run it through a tuning device (such as a VCR) first so that you can select TV channels.
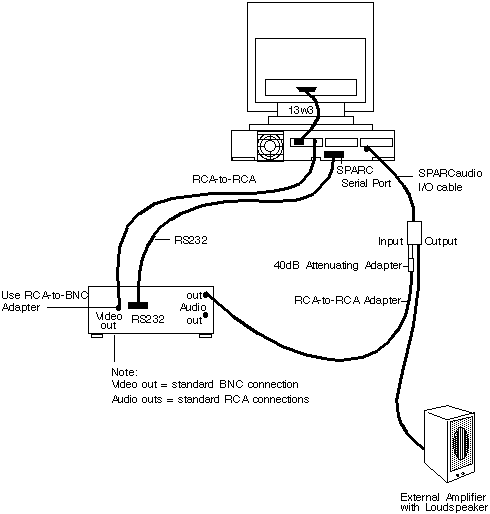
XVideo: Video Input (Laserdisc, RS232)
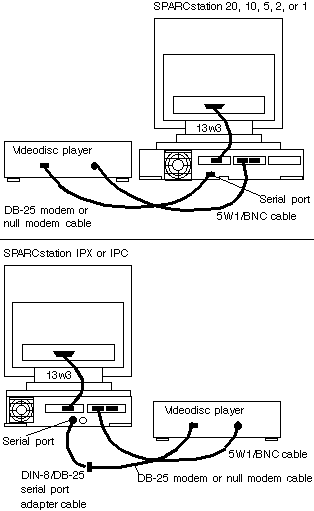
- Figure 3-11 Connecting RS232-controlled video input devices to XVideo.
XVideo: Video Input (Laserdisc, RS232) and Audio
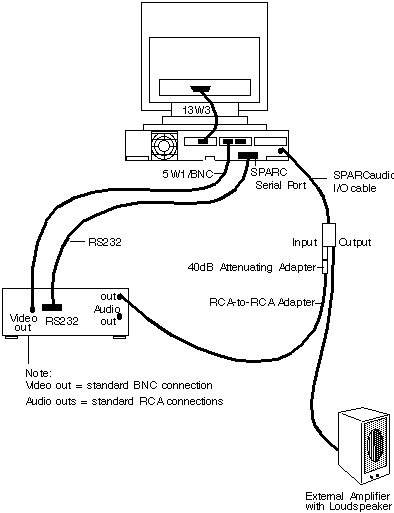
- Figure 3-12 Connecting a laserdisc player (with RS232) and speaker to XVideo.
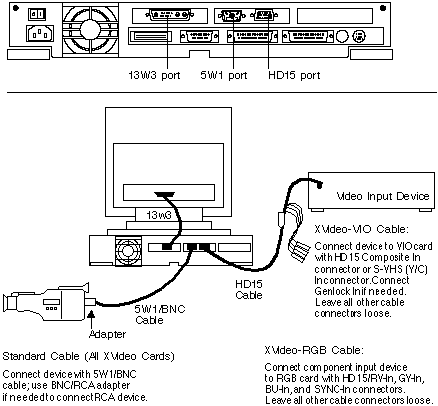
XVideo-VIO/RGB: 2nd Video Input and Video Output
- Figure 3-13 Connecting Devices to XVideo-VIO/RGB for displaying video input from two devices at once or displaying one video input and sending video out from the workstation to a video device. (The HD15 cable shown is for XVideo-VIO.)
For more details on how to set up two inputs or output, read on:
Displaying Video from 2 Sources
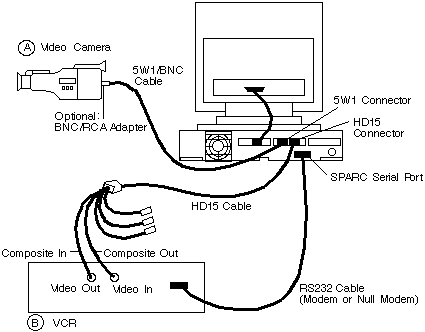
With XVideo-VIO/RGB, you can display video from two sources at once:
- Video Input 1: A video input from a composite source such as video camera (A), connected to the standard XVideo 5W1/BNC cable.
- Video Input 2:
- XVideo-VIO: One video input from a composite or S-VHS (Y/C) video source such as VCR (B), connected to the XVideo-VIO cable. Use the XVideo-VIO cable connectors labeled "COMP IN" for composite or "Y-C IN" for S-VHS (Y/C). If your video device has Genlock, use the "GENLOCK IN" connector too.
- -OR-
- XVideo-RGB: One video input from a RGB/YUV video source such as VCR (B), connected to the XVideo-RGB cable. Use the four XVideo-RGB cable connectors labeled "XXX IN."
- If a video device is serial (RS232) you also need to connect the RS232 cable (see Appendix C) to the SPARCstation serial port.
Sending Video Out to Video Output Device
You can display video from one composite source and at the same time send video out from the workstation to an output device (such as a TV monitor or video projector for display, or a VCR or other recording device for recording).
- Video Input (Optional): Display live video input from a composite source such as video camera (A), connected to the standard XVideo 5W1/BNC cable.
- Video Output:
- XVideo-VIO: One video output to a composite or S-VHS (Y/C) video output device such as VCR (B), connected to the XVideo-VIO cable. Use the XVideo-VIO cable connectors labeled "COMP OUT" for composite or "Y-C OUT" for S-VHS (Y/C).
- -OR-
- XVideo-RGB: One video output to a RGB/YUV video output device such as VCR (B), connected to the XVideo-RGB cable. Use the four XVideo-RGB cable connectors labeled "XXX OUT."
- The video that you are sending out to a video output device can come from a live source (such as a video camera) displayed on your monitor, or from a window or area on your monitor (up to 640x480 pixels for NTSC, up to 768x576 pixels for PAL or SECAM). See your Multimedia User's Guide for details.
- If a video device is serial (RS232) you also need to connect the RS232 cable (see Appendix C) to the SPARCstation serial port.
PowerVideo/MultiVideo: Video Input
- Figure 3-14 Connecting a video input device to PowerVideo or MultiVideo.
PowerVideo/MultiVideo: Video Input and Audio
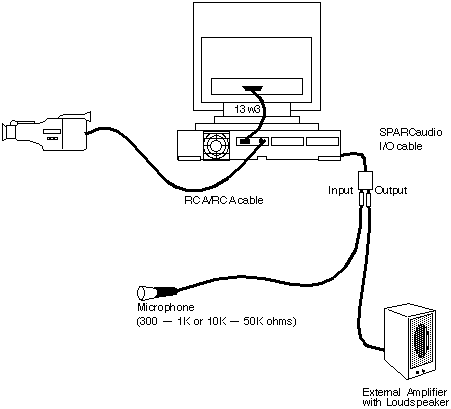
- Figure 3-15 Connecting a camera, microphone, and speaker to PowerVideo or MultiVideo.
PowerVideo/MultiVideo: Video Input (RS232) and Audio
- Figure 3-16 Connecting RS232-controlled audio/video devices to PowerVideo or MultiVideo.
Audio Cables
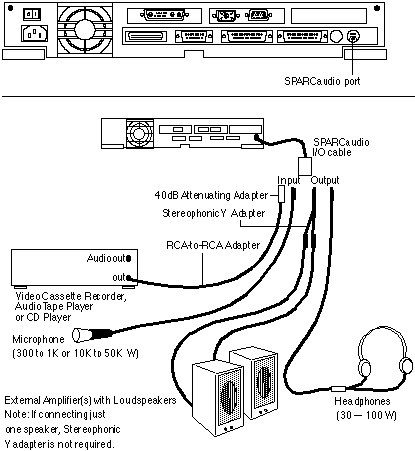
- Figure 3-17 Connecting Audio Devices to SPARCaudio
If you installed the Parallax Graphics video card into a new SPARCstation that has never been powered up, you'll need to refer to your SPARCstation Installation Guide for special power-up (and, if applicable, networking) instructions.
If you installed the video card into a SPARCstation that has previously been powered up, turn the power back on by turning on the switches you turned off before installation, in the following order:
- Turn on your monitor.
- Turn on any external drive units. (If you have more than one drive connected, and if these are daisy-chained, power-on the most remote drive first, then the next most, etc.)
- Turn on your SPARCstation.
When the login prompt appears on the host command line, you can start the software installation instructions in your Software Installation Guide.
This appendix covers the hardware specifications of Parallax Graphics XVideo, PowerVideo, and MultiVideo cards. Appendix A includes:
-
- General Specifications
- Specific Video Cards
System Requirements
- Platform SPARC-based workstations
- SBus Interface One or two available SBus slots:
- XVideo: 2 SBus slots
- PowerVideo or MultiVideo: 1 SBus slot
- Operating System Solaris 2.x (2.5, 2.4, or 2.3) or Solaris 1.x (SunOS 4.1.x)
- Window Environment OpenWindows (for Solaris 2.x or 1.x) or X11R5 (for Solaris 1.x only)
- Available Disk Space* 15-35 Megabytes (MB) space on a local hard drive:
- Solaris 2.5/OpenWindows 3.5: 35 MB
- Solaris 2.4/OpenWindows 3.4: 35 MB
- Solaris 2.3/OpenWindows 3.3: 35 MB
- Solaris 1.x (SunOS 4.1.x)/OpenWindows 3.0: 20 MB
- Solaris 1.x (SunOS 4.1.x)/X11R5 1.2: 20 MB
- Solaris 1.x (SunOS 4.1.x)/X11R5 1.1: 15 MB
- System RAM 32 MB recommended (16 MB minimum)
- Swap Space* 60 MB recommended (32 MB minimum)
- Monitor Types XVideo standard: 1152x900 pixels x 66 Hz
- XVideo 76 Hz (special order): 1152x900 pixels x 76 Hz
- PowerVideo or MultiVideo:
- 1152x900 pixels x 76 Hz
- 1152x900 pixels x 66 Hz
- 1152x900 pixels x 60Hz
- 1024x768 pixels x 72 Hz
- 640x480 pixels x 60 Hz
-
Architecture
- Architecture Video framebuffer card (1152x900x32 bits)
-
-
- When configuring your system for multimedia, it is advisable to contact your multimedia software supplier/s to find out their required disk space and recommended swap space, since some multimedia software requires significant memory and swap space.
Video Performance
- Video Standards NTSC, PAL, or SECAM (software selectable)
- Video Formats Composite, S-VHS (XVideo-VIO/RGB only), RGB (XVideo-RGB only), and YUV (XVideo-RGB only)
- Video Display NTSC, RGB, or YUV: 640x480 pixels (525 line) at
- 60 fields/second (30 frames per second)
- PAL, SECAM, RGB, or YUV: 768x576 pixels (625 line) at 50 fields/second (25 frames per second)
- Digitizer RGB, 24- bits per pixel
- Sampling Frequency Square pixels;
- 525 line: 12.2727 MHz;
- 625 line: 14.75 MHz
- Placement Arbitrary placement on screen;
- Realtime image sizing (reduce in, expand out);
- Switch video on a pixel-by-pixel basis
- Clipping/Stenciling Pixel-by-pixel masking of live video
- Overlay Capability 24-bit graphics over live (or still) 24-bit video
- Output (XVideo-VIO/RGB) Real-time video output from a rectangle on the display screen up to 640x480 pixels for NTSC, RGB, or YUV; or 768x576 pixels for PAL, SECAM, RGB, or YUV
- Video Input 2 (XVideo-VIO/RGB) Two simultaneous inputs at 15 Mpix/sec (live)
- Compression (Optional) Hardware accelerated JPEG compression and decompression for real-time motion video and still image capture and playback.
-
Display
- 32-bit Framebuffer Multidepth (24-bit and 8-bit) with graphics acceleration.
- Image Memory 1152x900x32 bits
- Monitor Support XVideo: 1152x900 pixels x 66 Hz (76 Hz available)
- MultiVideo/PowerVideo: support the following
display sizes and rates:
- 1152x900 pixels x 66Hz
- 1152x900 pixels x 76 Hz
- 1152x900 pixels x 60 Hz
- 1024x768 pixels x 76 Hz
- 640x480 pixels x 60 Hz
- Color Modes 24-bit RGB video and graphics;
- 8-bit pseudocolor graphics
- Display Connector 13W3 (Sun standard)
- Hardware Cursor Two colors in dedicated planes
-
Graphics Performance
- 24-bit map 4.1 Mpix/second random accesses;
- 6.6 Mpix/second image load/unload
- 8-bit map 4.1 Mpix/second random accesses;
- 14.3 Mpix/second image load/unload
- 1-bit map 25 Mpix/second image load/unload
- Text 153 Kchar/second drawing speed (10 x 10 fonts)
- Solid box 50 Mpix/second drawing speed
- BLIT 13.8 Mpix/second drawing speed
- 2D Vectors (clipped) 500 Kvec/second drawing speed (10 pixel, random)
- Logical ROPs Supported in all modes
- Interrupt Generated on video and compression
- Direct Memory Accesses Supported for compressed image streams
-
Connector Interfaces
- Display Connector 13W3 (Sun standard)
- Video Input 1 XVideo: 5W1 connector (5W1 to BNC cable included, plus BNC/RCA adapter);
- PowerVideo or MultiVideo: RCA connector (RCA to RCA cable included, plus RCA/BNC adapter )
- Video Input 2/Output XVideo-VIO: HD15 connector (HD15 to 3BNC-2DIN cable with sync lock, supports two 15 Mpix/second channels);
- XVideo-RGB: HD15 connector (HD15 to 8BNC cable with sync lock, supports two 15 Mpix/second channels)
-
Environment
- Power Requirements XVideo-VIO/RGB card:
- 4.3 amps @ +5V \xb1 5%
- 0.045 amps @ +12V \xb1 10%
- XVideo (without VIO/RGB), PowerVideo, or MultiVideo card:
- 3.2 amps @ +5V \xb1 5%
- 0.02 amps @ +12V \xb1 10%
- Operating Temperature 10-50\xb0 C (50-120\xb0 F)
- Humidity 10-90% noncondensing
- Calculated MTBF 40,000 hours (Mil 217 at 25\xb0 C)
-
Interoperability
- Cross-Platform Support Interoperable with Parallax Graphics EISA Bus/HP-UX and PCI Bus/IBM AIX video cards and software
-
Warranty
- Hardware Warranty One year limited hardware warranty (see Appendix B). Extensions to warranty available.
XVideo-VIO
- Video Display Up to two live video windows from composite or
S-VHS (Y/C) analog inputs
- Video Input Formats NTSC, PAL, SECAM as composite or S-VHS (software selectable)
- Video Output Formats NTSC, PAL as composite or S-VHS with sync lock
- Compression (Optional) Hardware accelerated JPEG compression and decompression for real-time motion video and still image capture and playback.
- Video Input/Output Cables HD15 to 3BNC-2DIN cable with sync lock (supports two 15 Mpix/second channels);
- 5W1 to BNC (plus BNC/RCA adapter)
-
XVideo-RGB
- Video Display Up to two live video windows from composite, RGB, or YUV analog inputs
- Video Input Formats RGB or YUV (or NTSC, PAL, or SECAM as composite) (software selectable)
- Video Output Formats RGB or YUV (or NTSC or PAL as composite) with sync lock
- Compression (Optional) Hardware accelerated JPEG compression and decompression for real-time motion video and still image capture and playback.
- Video Input/Output Cables HD15 to 8BNC cable with sync lock (supports two 15 Mpix/second channels);
- 5W1 to BNC (plus BNC/RCA adapter)
- YUV Format Betacam
-
XVideo (without VIO/RGB)
- Video Display One live video window from composite analog inputs
- Video Input Formats NTSC, PAL, SECAM as composite (software selectable)
- Compression (Optional) Hardware accelerated JPEG compression and decompression for real-time motion video and still image capture and playback.
- Video Input Cable 5W1 to BNC (plus BNC/RCA adapter)
-
PowerVideo
- Video Display One live video window from composite analog inputs
- Video Input Formats NTSC, PAL, SECAM as composite (software selectable)
- Compression Hardware accelerated JPEG compression and decompression for real-time motion video and still image capture and playback.
- Video Input Cable RCA to RCA (plus RCA/BNC adapter)
-
MultiVideo
- Video Display One live video window from composite analog inputs
- Video Input Formats NTSC, PAL, SECAM as composite (software selectable)
- Video Input Cable RCA to RCA (plus RCA/BNC adapter)
-
Appendix B:
Hardware Warranty and Repairs
All Parallax Graphics video cards come with a 1-year hardware warranty (1-year extensions to the warranty are available). This appendix includes:
-
- Hardware Warranty
- If You Need a Repair
Parallax Graphics hardware products are guaranteed to be free from manufacturing defects for one year from date of shipment.
All warranty repair work is FOB ("freight-on-board") Parallax Graphics, Santa Clara, California (USA) and includes parts and labor and return shipment to Parallax's customer. Expedited return shipments are available at additional cost.
This warranty does not cover gross neglect, physical damage, or use outside of published operating limits, nor does it cover software or firmware.
The hardware warranty can be extended through the purchase of a hardware maintenance agreement, which entitles the customer to replacement of warranted parts for a period of one year. A factory repair service is also available for out-of-warranty hardware.
To speed up the repair process, please call us at USA +1 703 450 7718 and ask for technical support. Tell us what the problem is and ask for an RMA ("return material authorization") number. Then ship the video card to Parallax for repair and include the RMA number with the shipment.
- You will pay for shipping the video card to Parallax Graphics for repair. Parallax is not liable for damage that occurs during shipment, so you may want to insure the shipment.
XVideo, PowerVideo, and MultiVideo cards support several types of serial (RS232-controlled) video devices. If you are planning to use a serial video device, you should read this appendix. This appendix includes:
-
- Supported Serial Video Devices
- Connecting a Serial Video Device
Parallax Graphics video cards can be used with a variety of serial (RS232) video input/output devices, including:
Video Cassette Recorders
Laserdisc Players
- Sony IP and VISCA players (models 1500, 1550 and 2000)
- Pioneer players (models 4200, 4400, and 8000)
Optical Disk Readers
- Panasonic ODR (model 3031F)
To connect a serial (RS232) video input/output device:
- You need to buy an RS-232C, DB-25 modem or null modem cable that is properly wired to connect a serial video input/output (DCE or DTE) device (see following page). You can buy ready-made modem or null modem cables and null modem converters (to convert a modem cable into a null-modem cable) from most computer dealers and computer supply stores.
- If you're using a SPARCstation IPX or IPC, you also need to buy a DIN-8/DB-25 adapter cable to connect the modem/null modem cable to the Sun DIN-8 serial port.
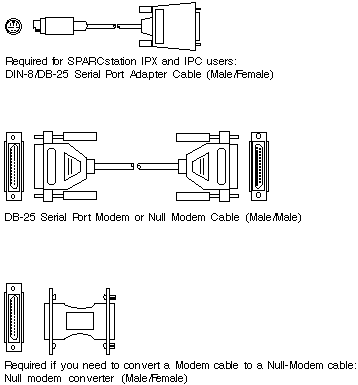
- Figure C-1 Cables and converter for serial video input/output devices.
- The cables should be wired to make the pin connections shown below.
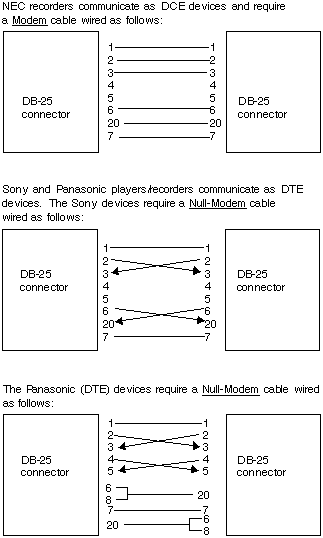
- Figure C-2 Cable wiring for serial (RS232) video input/output devices
- Make sure that your SPARCstation serial ports are properly configured for use with your selected video input/output device.
- Configure the SPARCstation serial port (ttya or ttyb)-- which is factory-set to operate in asynchronous RS-423 mode--to operate in asynchronous RS-232 mode.
See your SPARCstation manuals for instructions on how to configure your serial ports.
- Set up the cables to connect your serial video input/output device to your SPARCstation and video card.
- Basic cabling diagrams--which show you how to connect a serial video input/output device to your SPARCstation--are provided in Chapter 3
Before you connect a serial (RS232) video input/output device, please read and follow the installation instructions supplied in the video device manufacturer's manuals and in your SPARCstation manuals.