Hardware Installation Guide
For XVideo Xtra on Sun SPARCstations
Part Number: 917-032065, Rev. C
(C) Copyright Parallax Graphics, Inc. 1997. All rights reserved.
Printed in the U.S.A.
Parallax Graphics, Inc., 2500 Walsh Street, Santa Clara, CA 95051 USA
Phone: 408-727-2220; Fax: 408-727-2367
E-mail: sales@parallax.com
Web: http://www.parallax.com
No part of this manual or the accompanying software may be reproduced or transmitted in any form or by any means--electronic or mechanical, including photocopying and recording--without the prior written permission of Parallax Graphics, Inc.
VideoStream, XVideo, XVideo Xtra, PowerVideo, MultiVideo, Video Development Environment, VideoTool, MovieTool, Real-Time MovieTool, and Parallax Graphics are trademarks or registered trademarks of Parallax Graphics, Inc.
All other products or services mentioned in this document are identified by the trademarks or service marks of their respective companies or organizations, and Parallax Graphics, Inc. disclaims any responsibility for specifying which marks are owned by which companies or organizations.
Table of Contents
Preface
How To Use This Manual
Support Contacts
Your Video Overlay Card's Capabilities
XVideo Xtra
Differences from Video Framebuffer Cards
Requirements
Installing the Video Card
Video Cards in a Workstation
Installing a PCI Bus Card
Installing an SBus Card
Connecting Cables and Devices
Cables for XVideo Xtra
Audio Cables
How to Connect the Cables
XVideo Xtra Output Connections
Multiple Video Cards in One System
Powering Up the Sun Workstation
Appendix A: Parallax Video Specifications
General Specifications
Specific Video Overlay Cards
Appendix B: Hardware Warranty and Repairs
Appendix C: FCC and CE Mark Compliance
Index
This preface describes how to use this manual and how to reach us if you need technical support. This preface includes:
How To Use This Manual
For Installation and Reference
Font Conventions
Related Documents
Technical Support Contacts
Before you begin using this manual, please read your Release Notes to find out about any recently added instructions.
This Hardware Installation Guide describes your Parallax Graphics video overlay card and cables, and tells you how to install the video overlay card and set up the cables. You can use this manual as an installation guide and a reference.
Italics Manual titles, new terms being defined.
Typewriter Font Commands typed in an X window, text that would appear in an X window.
Release Notes Skim before installation, then read in detail. These notes provide important information about recent changes and bugs.
Software Installation Guide Use for software installation and
de-installation (located inside front of CD-ROM case).
Multimedia User's Guide Learn how to use the application software,
VideoTool, MovieTool, etc.
Video Development Environment Reference Guide
For developers building custom software applications using digital video: Use as a
reference guide in development.
If you need any technical assistance during installation, please contact Parallax Graphics technical support:
Parallax Graphics
E-mail: tsupport@parallax.com
World Wide Web: http://www.parallax.com
Phone: +1 703-450-7718
Introduction
This chapter briefly describes your Parallax Graphics video overlay card and system requirements, and discusses the differences between Parallax Graphics video framebuffer cards and video overlay cards. This chapter includes:
Your Video Overlay Card's Capabilities
XVideo Xtra
Differences from Video Framebuffer Cards
System Requirements
XVideo Xtra is a video overlay card that displays high quality video on your Sun workstation, available for both PCI Bus and SBus:
Full motion video
30 frames/second NTSC
25 frames/second PAL or SECAM
Full resolution video
640x480 pixels (525 line) NTSC
768x576 pixels (625 line) PAL or SECAM
24-bit TrueColor video
With any Parallax Graphics video card, you can display live video from a video camera, VCR, TV cable, or other analog source. You can also capture still images for monitoring applications such as manufacturing inspection and surveillance. XVideo Xtra supports video input from composite and S-VHS (Y/C) format video devices, in NTSC, PAL, and SECAM standards.
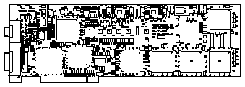
Figure 1-1 XVideo Xtra video overlay card for PCI Bus.
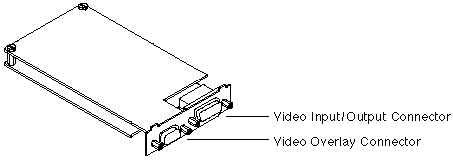
Figure 1-2 XVideo Xtra video overlay card for SBus.
With XVideo Xtra's hardware compression, you can capture and compress digital video movies in real-time and play them back locally or over a network from a video-on-demand server. You can send and receive compressed video over a data network in real-time for remote monitoring and videoconferencing applications such as distance learning, collaboration, and telemedicine.
With XVideo Xtra, you can also display live video from two sources simultaneously and send video out from the workstation to a VCR, video projector, or other analog video device for presentations or distribution to a wider audience. At a given moment, you can display live video inputs from two sources simultaneously, or you can display one live video input and send video out to a VCR or other device. Video output is from overlay images only, and can be composite or S-VHS (Y/C).
XVideo Xtra for PCI Bus and SBus have identical features and capabilities.
The XVideo Xtra video overlay cards are very similar in functionality to XVideo-VIO video framebuffer cards.
The main difference is that the video overlay cards overlay 24-bit video on top of graphics provided by a standard framebuffer card, while the video framebuffer cards integrate graphics and video in one framebuffer. For video output, this means that XVideo Xtra's output is limited to windows and graphics displayed on the overlay card, not the framebuffer card.
XVideo Xtra is also a single-slot card (versus two slots for XVideo), and is available for both PCI Bus and SBus (SBus only for XVideo).
The XVideo Xtra video overlay cards look similar to PowerVideo video framebuffer cards, but with different connectors and cables as shown in Chapter 3 of this manual.
For information about the software differences, see your Multimedia User's Guide, and Video Development Environment Reference Guide.
System requirements are slightly different for video overlay cards than for video framebuffer cards. Before you start installing your XVideo Xtra video overlay card, please check to make sure you have all of the required hardware, software, etc. to use your new card.
For the latest list of tested systems (workstations, monitors, framebuffers), see ``Tested Hardware'' in your Release Notes. For complete specifications, see Appendix A in this manual.
Platform Sun workstations with SBus or PCI Bus slots (see Release Notes for a current list of tested systems)
Bus Interface One available SBus or PCI Bus slot
Operating System Solaris 2.5 (SunOS 5.5) or higher; Solaris 2.5.1 (SunOS 5.5.1) or higher required for PCI Bus
Window Environment OpenWindows 3.5 or higher, or CDE; OpenWindows 3.5.1 or higher, or CDE required for PCI Bus
Available Disk Space 35 Megabytes (MB) space on a local hard drive
System RAM 64 MB recommended (32 MB minimum)
Swap Space 64 MB recommended (32 MB minimum)
Framebuffer Types Creator or Creator 3D (SBus or PCI Bus), TGX or TGX+ (SBus only) (see Release Notes for a current list of tested framebuffers)
Display Resolutions Calibration files provided for 1280 x 1024 pixels @ 67 or 76 Hz, 1152 x 900 pixels @ 66 or 76 Hz, and 1024 x 768
pixels @ 76 Hz (see Release Notes for a current list of tested display resolutions/calibration files)
- Not all display resolutions have been tested with all framebuffers. Please see your Release Notes for details.
This chapter describes how to install your Parallax Graphics video card in your Sun workstation. This chapter includes:
Multi Video Cards in a Workstation
Installing a PCI Bus Card
Installing an SBus Card
- To get up-to-date information about any recent changes, please read the Release Notes before you begin installation.
- We hope that your installation of your XVideo Xtra card is easy and problem-free. If you need any technical help during installation, please contact Parallax Graphics technical support.
- To USA and European customers: You are responsible to ensure continued compliance with USA Federal Communications Commission (FCC) and European Community (CE Mark) rules by installing and using this video card and cables as described in the manuals, by using the cables provided, by not making any changes or modifications to the video card or cables, and in the USA, by using the equipment in a commercial zone. In the USA, if you do not follow these guidelines and your equipment causes disruptive radio interference, you may have to stop using the equipment until you correct the radio interference problem at your own expense. For more information, see Appendix C.
If you are using Parallax release 1.2 or higher (available only for PCI Bus on release 1.2/Solaris 2.5.1), you can use more than one XVideo Xtra card in a workstation -- if you have available slots.
If you are installing more than one XVideo Xtra card in your multi-slot Sun workstation, follow normal installation procedures for each card. See here for special instructions for multiple card cable set-up). Your Software Installation Guide also has special multiple card set-up instructions. Parallax supports up to three XVideo Xtra cards per Sun workstation.
Please use your Sun manuals as the primary instructions for installing this PCI Bus card. This chapter is meant only to be a supplement with instructions specific to your XVideo Xtra card.
Make sure your system configuration (framebuffer card, display resolution, etc.) is supported by XVideo Xtra. See "Tested Hardware" in your Release Notes and "System Requirements" in Appendix A of this manual.
Unlike our video framebuffer cards, the video overlay cards do not use a hardware switch to select a display resolution and refresh rate. You will calibrate for your display resolution and framebuffer type with software (the Calibrate program) after you install your software.
Power down your workstation and turn off the system power as instructed in the Sun manuals.
Open the system case as instructed in the Sun manuals.
Get the wrist strap from the Parallax product boxes. Attach the adhesive copper strip to metal on the computer chassis. Wrap the other end twice around your wrist with the adhesive side against your skin.
.
Figure 2-1 Attach the grounding strap to your wrist and workstation.
Pick a 33 MHz/5 volt PCI Bus slot for the XVideo Xtra card (refer to the Sun manuals to find out which are 33 MHz/5 volt slots). For that PCI Bus slot, remove the filler panel from the back panel of the system chassis as instructed in the Sun manuals.
XVideo Xtra will not work in a 66 MHz/3.3 volt PCI Bus slot, and does not fit in that kind of slot.
Pick up the XVideo Xtra card, holding it by the edges or corners. Fit the card back panel into the selected open spot in the system chassis back panel as instructed in the Sun manuals.
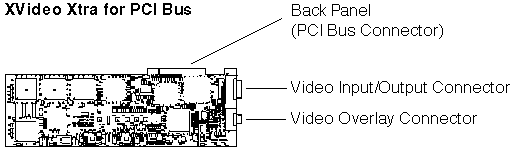
Figure 2-2 Connectors on XVideo Xtra for PCI Bus.
Gently align the XVideo Xtra card connector so that it touches the selected card slot on the main logic card. Holding the XVideo Xtra card by its corners, push it straight into the card slot until the XVideo Xtra card is fully seated as instructed in the Sun manuals.
Attach the XVideo Xtra card bracket tab to the system chassis as instructed in the Sun manuals.
Detach the wrist strap and close the system unit as instructed in the Sun manuals.
Please use your Sun manuals as the primary instructions for installing this SBus card. This chapter is meant only to be a supplement with instructions specific to your XVideo Xtra card.
Make sure your system configuration (framebuffer card, display resolution, etc.) is supported by XVideo Xtra. See ``Tested Hardware'' in your Release Notes and ``System Requirements'' in Appendix A of this manual.
Unlike our video framebuffer cards, the video overlay cards do not use a hardware switch to select a display size and refresh rate. You will calibrate for your display size, refresh rate, and framebuffer type with software (the Calibrate program) after you install your software.
Power down your workstation and turn off the system power as instructed in the Sun manuals.
Open the system case as instructed in the Sun manuals.
Get the wrist strap from the Parallax product boxes. Attach the adhesive copper strip to metal on the computer chassis. Wrap the other end twice around your wrist with the adhesive side against your skin.
Figure 2-3 Attach the grounding strap to your wrist and workstation.
Pick an SBus slot. For that slot, remove the filler panel from the system chassis back panel as instructed in the Sun manuals.
In SPARCstation 10 and 20, any open SBus slot will work, with the constraint that if you put XVideo Xtra in slot 2 or slot 4 (bottom slots) then the slot above the Xtra must not contain a ``double-height'' SBus card (a card with a daughter card, such as XVideo Xtra).

Figure 2-4 Choosing an SBus slot for your video overlay card.
If you are installing in an UltraSPARC, SPARCstation 20, or SPARCstation 10, then remove the XVideo Xtra backplate adapter. (The XVideo Xtra backplate adapter is required for installation in a SPARCstation 5, but must be removed for installation in other systems.) To remove the backplate adapter:
Holding the XVideo Xtra card by the edges, remove it from its anti-static bag. Place it on an anti-static surface such as the anti-static bag it was shipped in.
Use a Phillips screwdriver to remove the two screws from the backplate adapter. Remove the backplate adapter. You may want to keep the screws and backplate adapter in case you use the card later in a SPARCstation 5.
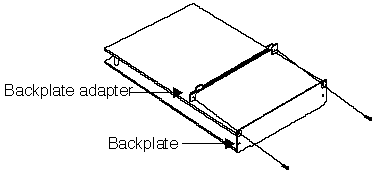
Figure 3-5 Removing the backplate adapter.
If you are installing in an UltraSPARC, SPARCstation 10 or 20, then open the SBus card retainers -- as instructed in the Sun manuals -- for the SBus slot you are planning to use.
Pick up the XVideo Xtra card, holding it by the edges or corners. Fit the Xtra card back panel into the selected open spot in the system chassis back panel, as instructed in the Sun manuals.
Figure 3-6 Connectors on XVideo Xtra for SBus.
Gently align the XVideo Xtra card connector so that it touches the selected card slot on the main logic card. Holding the XVideo Xtra card by its corners, push it straight into the card slot until the XVideo Xtra card is fully seated as instructed in the Sun manuals.
If you are installing in an UltraSPARC, SPARCstation 20, or SPARCstation 10, then you need to install some retainers (or retainers, washers, and screws) to keep the Xtra card in place. See your Sun manuals for instructions.
Detach the wrist strap and close the system unit as instructed in the Sun manuals.
This chapter gives information on the cables included with your video card and how to set up cables for a variety of configurations with video peripherals. This chapter includes:
Cables for XVideo Xtra
Audio Cables
How to Connect the Cables
XVideo Xtra Output Connections
Multiple Video Cards in One System
Powering Up the Sun Workstation
Your XVideo Xtra video overlay card comes with a cable and adapters for connecting video devices, and a cable to connect the framebuffer card to the video overlay card (XVideo Xtra) to the monitor.
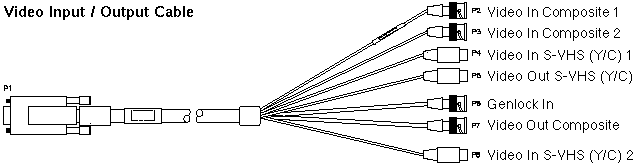
Figure 3-1 The composite/S-VHS (Y/C) video input/output cable (HD26/3DIN-4BNC, part #HP-C-VIO). ``Genlock In'' currently does not support Genlock, but provides a third composite input instead.

Figure 3-2 We provide two BNC (f) to RCA (m) adapters so that you can connect an RCA video device to a BNC (composite) connector on the cable above.

Figure 3-3 The video overlay cable connects the framebuffer to the video overlay card (Xtra) to the monitor (13W3/HD15/13W3, part #SUNO-C-DISP).
For connecting audio inputs and outputs, use the standard Sun audio cables and connectors, per the instructions in your Sun manuals. Audio cables are not Parallax-specific, and are not supplied by Parallax Graphics.
Audio inputs can include microphones and ``audio out'' from a video source such as a VCR or laserdisc player. Audio outputs can include headphones, speakers, and sending audio to ``audio in'' for a VCR.
If your audio source or receiver has unusual connectors, you may need audio adapters and/or adapter cables, which you can purchase at most electronic parts stores.
XVideo Xtra can be connected to two video input sources at once and can display both video inputs simultaneously.
Make sure the Sun workstation power is turned off for safety before you begin to connect cables.
Connect the video overlay cable and input/output cable as shown below (framebuffer [P1] to Xtra [P2] to monitor [P3]).
Connect the video input/output cable to the Xtra card (P1) and to video sources (P2, P3, P4, P6, P8). Match your video source's formats (composite or S-VHS), by choosing composite or S-VHS connectors identified by labels such as ``Video In S-VHS (Y/C) 1.''
A TV cable video source must come through a tuning device (such as a VCR) first so you can select TV channels.
Connect audio input and output to the Sun workstation audio system as described in your Sun manuals. The example below shows an older-style workstation with a single audio I/O port.
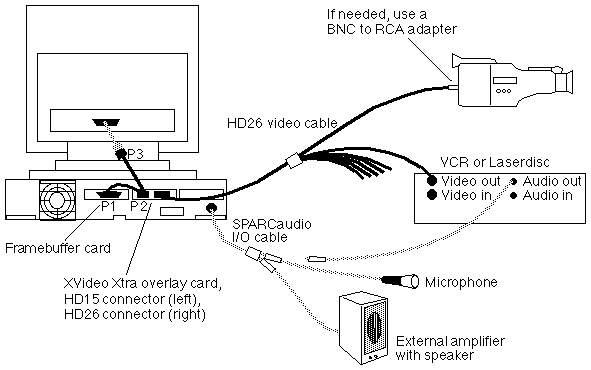
Figure 3-4 An XVideo Xtra card connected to two video input sources. Parallax-supplied cables are shown in black; other cables are shown in grey.
XVideo Xtra can also display one live video and send video overlay out to an external device such as a VCR, laserdisc recorder, TV monitor, or video projector. The video for output may come from live video, pre-recorded MovieTool movies, VideoTool-displayed still images, and from independent software vendor applications using XVideo Xtra. See your Multimedia User's Guide for details on output.
To use video output, connect one of the XVideo Xtra video output connectors (``Video Out Composite'' [P7] or ``Video Out S-VHS (Y/C)'' [P5]) to a video input connector on the external video device (such as a VCR or Laserdisc Recorder).
For audio output, connect the Sun audio output to an audio input on the external video device, as instructed in the Sun manuals.
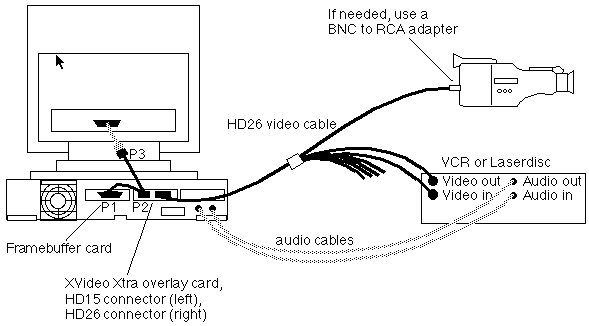
Figure 3-5 Video output connections for XVideo Xtra. Output can be used while displaying one live video input (and while showing captured still images and playing back digital video movies). Video input in this diagram could be from either the camera or the VCR/Laserdisc. Video output is to the VCR/Laserdisc Recorder. Audio input in this diagram is from the VCR/Laserdisc, and audio output is to the VCR/Laserdisc Recorder. Parallax-supplied cables are shown in black; other cables are shown in grey.
If you are using Parallax release 1.2 or higher and have enough slots, you can use more than one XVideo Xtra card in a workstation. Set up the cables so that the Parallax Graphics video overlay cables are linked to connect the framebuffer to the series of video overlay cards to the monitor cable. The order of the video cards is not important.
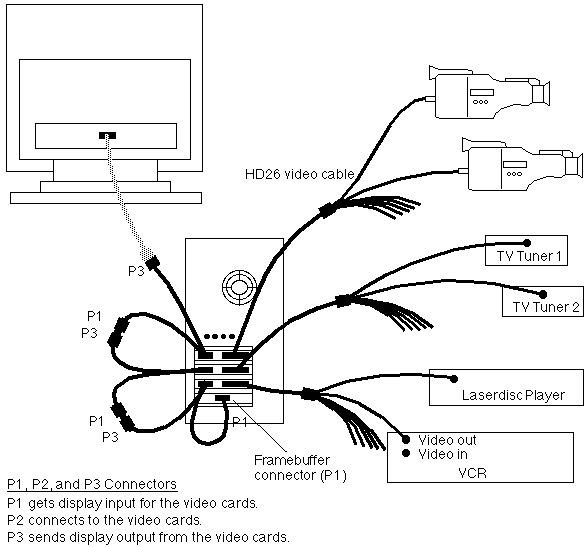
Figure 3-6 Setting up cables for two or three video cards in a Sun work-station. Parallax-supplied cables are shown in black; other cables are grey. Audio cables not shown.
The sequence of the video overlay cards is not important. You can connect the framebuffer (first P1 connector) to the video cards -- in any sequence -- to the monitor cable (last P3).
For multiple video cards, also look at the special set-up instructions in your Software Installation Guide.
After you have the Parallax cables (and other cables) connected, you can power up your Sun workstation. Refer to your Sun manuals for directions on how to power up the workstation.
When the login prompt appears on the command line, you can
start the software installation according to the instructions in your Software Installation Guide (the small booklet enclosed in the software CD-ROM case).
This appendix covers the specifications of Parallax Graphics XVideo Xtra. Appendix A includes:
General Specifications
System Requirements
Video Architecture
Software Support
Video Performance
Display
Environment
Interoperability
Warranty
Specific Video Overlay Cards
XVideo Xtra
Platform Sun workstations with SBus or PCI Bus slots (see Release Notes for a current list of tested systems)
Bus Interface One available SBus or PCI Bus slot
Operating System Solaris 2.5 (SunOS 5.5) or higher; Solaris 2.5.1 (SunOS 5.5.1) or higher required for PCI Bus
Window Environment OpenWindows 3.5 or higher, or CDE; OpenWindows 3.5.1 or higher, or CDE required for PCI Bus
Available Disk Space 35 Megabytes (MB) space on a local hard drive
System RAM 64 MB recommended (32 MB minimum)
Swap Space 64 MB recommended (32 MB minimum)
Framebuffer Types Creator or Creator 3D (SBus or PCI Bus), TGX or TGX+ (SBus only) (see Release Notes for a current list of tested framebuffers)
Display Resolutions Calibration files provided for 1280 x 1024 pixels @ 67 or 76 Hz, 1152 x 900 pixels @ 66 or 76 Hz, and 1024 x 768
pixels @ 76 Hz (see Release Notes for a current list of tested display resolutions/calibration files)
Architecture Video overlay card (up to 1280 x 1024 x 32 bits)
Software Support
Applications VideoTool for video display and still image capture
MovieTool for motion video capture and playback
Developer Tools Video Development Environment includes API, libraries, widgets, and sample source code and programs
Driver Device driver for Solaris 2.5 or higher for SBus; Solaris 2.5.1 or higher for PCI Bus
Video Performance
NTSC 640 x 480 pixels @ 60 fields (30 frames)/second (525 line)
PAL or SECAM 768 x 576 pixels @ 50 fields (25 frames)/second (625 line)
Sampling Frequency Square pixels:
525 line: 12.2727 MHz
625 line: 14.75 MHz
Placement Arbitrary placement on screen;
Realtime image sizing (reduce in, expand out);
Switch video on a pixel-by-pixel basis
Clipping/Stenciling Pixel-by-pixel masking of live video
Pixel Replication Hardware enabled zoom at 1x and 2x (2x width/height, 4x area) for one live video window
Color Mode 24-bit RGB video
Power Requirements SBus: 4.0 Amps @ +5VDC \xb1 5%
0.030 Amps @ +12VDC \xb1 10%
0.035 Amps @ -12VDC \xb1 10%
PCI Bus: 5.0 Amps @ +5VDC \xb1 5%
0.030 Amps @ +12VDC \xb1 10%
0.035 Amps @ -12VDC \xb1 10%
Operating Temperature 10-50\xb0 C (50-120\xb0 F)
Cross-Platform Support Interoperable with Parallax Graphics SBus/Solaris framebuffer video cards and software, and EISA Bus/HP-UX video overlay cards and software
Hardware Warranty One year limited hardware warranty (see Appendix B).
Video Display Up to two simultaneous live video windows from
composite and/or S-VHS (Y/C) analog inputs
Video Input Formats NTSC, PAL, SECAM as composite or S-VHS (Y/C)
software selectable
Video Output Formats NTSC, PAL as composite or S-VHS (Y/C)
Compression Hardware accelerated JPEG compression and decompression for real-time motion video and still image capture and playback (15:1 to 100:1).
Video Overlay Cable 13W3 to HD15 to 13W3 Y cable
Video Input/Output Cable HD26 to 3 DIN and 4 BNC cable
Software VideoTool, MovieTool, and Video Development
Environment
All Parallax Graphics video cards come with a 1-year hardware warranty (1-year extensions to the warranty are available). This appendix includes:
Hardware Warranty
If You Need a Repair
Parallax Graphics hardware products are guaranteed to be free from manufacturing defects for one year from date of shipment.
All warranty repair work is FOB (``freight-on-board'') Parallax Graphics, Santa Clara, California (USA) and includes parts and labor and return shipment to Parallax's customer. Expedited return shipments are available at additional cost.
This warranty does not cover gross neglect, physical damage, or use outside of published operating limits, nor does it cover software or firmware.
The hardware warranty can be extended through the purchase of a hardware maintenance agreement, which entitles the customer to replacement of warranted parts for a period of one year. A factory repair service is also available for out-of-warranty hardware.
To speed up the repair process, please call us at +1 703 450 7718 and ask for technical support. Tell us what the problem is and ask for an RMA (``return material authorization'') number. Then ship the video card to Parallax for repair and include the RMA number with the shipment.
- You will pay for shipping the video card to Parallax Graphics for repair. Parallax is not liable for damage that occurs during shipment, so you may want to insure the shipment.
To prevent disruption of radio frequency communications such as ambulance, police, and air traffic control, the USA Federal Communications Commission (FCC) and European Union have established rules limiting radio frequency interference generated by equipment such as computers and video cards. This appendix briefly describes the regulatory compliance and requirements.
Preventing Radio Interference: Your Responsibility
Avoiding Penalties in the USA
FCC Class A Notice
This video card and cables have been tested and comply with FCC (Part 15, Class A devices) and European (CE Mark: EN50081-1 [EN55022], EN50082-1) standards. The cables are required to comply with these standards. If you use this equipment in the USA or Europe, you are responsible to ensure continued compliance as follows:
- You must install and use this video card and cables as described in the manuals.
- You must use the video card with the cables provided.
- You must not make any changes or modifications to the video card and cables.
- In the USA, you must use the video card and cables in a commercial zone.
If you do not follow the four guidelines above (for instance, if you use the equipment in a residential zone in the USA), you may cause disruptive radio frequency interference. If that happens in the USA, you may have to stop using the equipment until you correct the radio interference problem at your own expense.
This device complies with part 15 of the FCC Rules. Operation is subject to the following two conditions: (1) This device may not cause harmful interference, and (2) this device must accept any interference received, including interference that may cause undesired operation.
Index
A
adapters:
audio adapters 3-3
BNC to RCA adapters 3-2
audio cables and adapters 3-3
C
cables:
audio cables 3-3
setting up cables 3-4 to 3-6
XVideo Xtra cables 3-2
Calibrate (calibration for display resolution) 2-3, 2-5
cameras, connecting 3-4 to 3-6
CE Mark compliance C-1
compression hardware 1-3, A-4
connecting to video inputs and output 3-4 to 3-6
connectors (see adapters)
contacting Parallax Graphics v
D
display resolution and refresh rate
supported/tested resolutions 1-5, A-2
calibration for resolution 2-3, 2-5
E
e-mail v
F
FCC compliance C-1
font conventions iv
framebuffers, supported 1-5, A-2
G
Genlock In 3-2
grounding strap 2-3, 2-5
H
hardware warranty B-2
I
installation
cables 3-4 to 3-6
PCI Bus card 2-3
SBus card 2-5
L
laserdisc players, connecting 3-4 to 3-6
M
metal protector plates 2-9
monitors, supported (see display resolutions) 1-5, A-2
multiple video cards in one system 2-2, 3-6
(also see your Software Installation Guide)
N
NTSC A-3, A-4
P
PAL A-3, A-4
Parallax Graphics, how to reach us v
Parallax release 1.2 or higher 2-2, 3-6
PCI Bus
installing XVideo Xtra for PCI Bus 2-3
PCI Bus slot, 33 MHz/5 volt 2-4
platforms supported 1-5, A-2
power requirements A-3
R
refresh rates, supported 1-5, A-2
Release Notes iv
repairs B-2
requirements, system 1-5, A-2
S
SBus, installing XVideo Xtra for SBus 2-5
SECAM A-3, A-4
specifications for XVideo Xtra A-1 to A-4
static, protecting against 2-5
Sun workstations, supported 1-5, A-2
support v
system requirements 1-5, A-2
T
technical support v
temperature, operating A-3
TrueColor, 24-bit 1-2
V
video architecture A-2
video formats supported A-4
video input/output cable 3-2
Genlock In 3-2
Video In Composite 1 (or 2) 3-2, 3-4
Video In S-VHS 1 (or 2) 3-2
Video Out Composite 3-2
Video Out S-VHS 3-2, 3-5
video inputs/sources, connecting 3-4 to 3-6
connecting a TV cable 3-4
connecting video cameras, laserdiscs, VCRs 3-4 to 3-6
video overlay cable 3-2
video quality (motion, resolution, TrueColor) 1-2
W
warranty, hardware B-2
wrist strap 2-3, 2-5
X
XVideo Xtra
backplate adapter, removing (SBus) 2-6
capabilities 1-2 to 1-4
differences from XVideo framebuffer cards 1-4